LUUM.IO
XPD-T2P - INSTALL GUIDE#
Introduction#
About This Guide#
This guide provides complete instructions for installing and setting up the XPD-T2P module. It includes details on mounting, wiring, power connection, commissioning, and basic troubleshooting.
Cautions And Warnings#
When installing hardware, it is important to follow safety precautions to avoid potential injuries or damage to the equipment. Failure to follow safety guidelines can result in electric shock, fire, or other hazards.
DEFINITIONS:
Note
A note is typically used to provide additional information or clarification that is relevant to the installation process. It may include recommendations, tips, or other useful information that can help ensure a successful installation.
Caution
A caution statement indicates a potential hazard that could result in minor or moderate injury, or cause damage to the product if appropriate precautions are not taken. They are used to alert the reader to a potential risk and provide instructions on how to avoid it.
Danger
A danger statement indicates a potential hazard that could result in serious injury or death if appropriate precautions are not taken. They are used to alert the reader to a potential risk that is critical and requires immediate attention to prevent harm. It may provide instructions on how to avoid the hazard or recommend seeking professional assistance.
SAFETY PRECAUTIONS:
Caution
Follow all applicable local and national electrical codes and regulations. While a licensed electrician is not required, the installer should be familiar with Class 2 low-voltage wiring practices.
Caution
Do not install or service the device while it is connected to an X-PoE switch.
Caution
Use only with X-PoE switches or ports. The XPD-T2P is not compatible with traditional PoE sources.
Caution
Do not connect external power supplies to output terminals.
Caution
Ensure all wiring is de-energized before connecting or disconnecting any terminals.
Caution
Ensure all wiring connections are secure and properly terminated.
Caution
This equipment is not suitable for use in locations where children are likely to be present.
Note
Do not exceed the rated output power for any channel.
Note
For use in dry locations only. If used in wet locations, a waterproof kit (sold separately) must be installed.
Lors de l'installation de matériel, il est important de suivre les précautions de sécurité afin d'éviter tout risque de blessure ou de dommage matériel. Ne pas respecter les consignes de sécurité peut entraîner des risques de choc électrique, d'incendie ou d'autres dangers.
DÉFINITIONS:
Remarque
Une remarque est généralement utilisée pour fournir des informations supplémentaires ou des éclaircissements pertinents par rapport au processus d'installation. Elle peut contenir des recommandations, des conseils ou d'autres informations utiles qui peuvent aider à assurer une installation réussie.
Attention
Une mention d'attention indique un danger potentiel qui pourrait entraîner des blessures légères ou modérées, ou endommager le produit si les précautions appropriées ne sont pas prises. Elles sont utilisées pour alerter le lecteur d'un risque potentiel et fournir des instructions sur la manière de l'éviter.
Danger
Une mention de danger indique un danger potentiel qui pourrait entraîner des blessures graves ou la mort si les précautions appropriées ne sont pas prises. Elles sont utilisées pour alerter le lecteur d'un risque potentiel critique et nécessitant une attention immédiate pour éviter tout dommage. Elles peuvent fournir des instructions sur la manière d'éviter le danger ou recommander de faire appel à une assistance professionnelle.
PRÉCAUTIONS DE SÉCURITÉ:
Attention
Respecter tous les codes et règlements électriques locaux et nationaux applicables. Bien qu’un électricien qualifié ne soit pas requis, l’installateur doit être familiarisé avec les pratiques de câblage à basse tension de Classe 2.
Attention
Ne pas installer ni entretenir l’appareil lorsqu’il est connecté à un commutateur X-PoE.
Attention
Utiliser uniquement avec des commutateurs ou ports X-PoE. Le XPD-T2P n’est pas compatible avec les sources PoE traditionnelles.
Attention
Ne pas connecter d’alimentations externes aux bornes de sortie.
Attention
S’assurer que tout le câblage est hors tension avant de raccorder ou de débrancher des bornes.
Attention
Vérifier que toutes les connexions de câblage sont sécurisées et correctement terminées.
Attention
Cet équipement ne convient pas pour une utilisation dans des endroits où des enfants sont susceptibles d’être présents.
Remarque
Ne pas dépasser la puissance de sortie nominale pour aucun canal.
Remarque
Pour utilisation dans des endroits secs uniquement. En cas d’utilisation dans des endroits humides, un kit étanche (vendu séparément) doit être installé.
Product Overview#
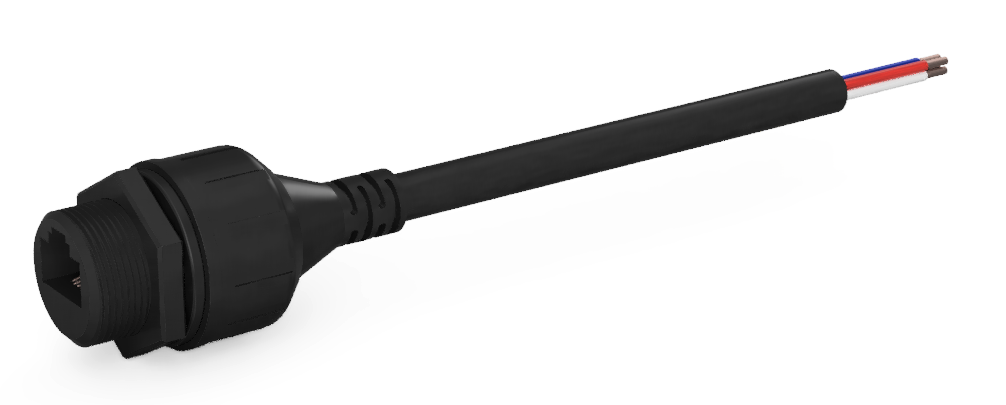
The XPD-T2P is a passive, Class 2 X-PoE powered device that converts RJ45 input power to wire terminals for direct DC output. It provides up to 65W per channel at 57VDC total output power for connected loads. The device includes signature resistors that allow the connected X-PoE switch to detect the unit and automatically determine the appropriate power level to supply. The XPD-T2P is designed as a panel-mount device for installation within lighting fixtures.
Key features:
- Dual-channel outputs supporting up to 65W per channel at 57VDC
- X-PoE Class 2 input for power delivery and device detection via signature resistors
- Panel-mount design for integration with lighting fixtures
- Durable construction with wire leads for direct connection
Ordering Information#
| XPDs | |
|---|---|
| XPD-T2P | Standard XPD-T2P Module |
| XPD-T2PS | XPD with Adaptive Signature |
| Accessories | |
|---|---|
| XPD-T2P-WPKIT | Waterproofing Kit |
See the XPD Specification Table for full specification and class information.
Installation#
Parts List#
Before getting started with the installation process, it's important to make sure all the necessary components are included. Here's what should be found inside the box:
- (1) XPD-T2P Module
Panel-Mount Installation#
Note
The hardware and devices shown in these instructions are meant for guidance purposes and may not accurately represent the specific device or environment you're installing into.
Perform the following steps to install the device on a surface:
- Review all cautions and warnings to ensure safe installation practices are followed.
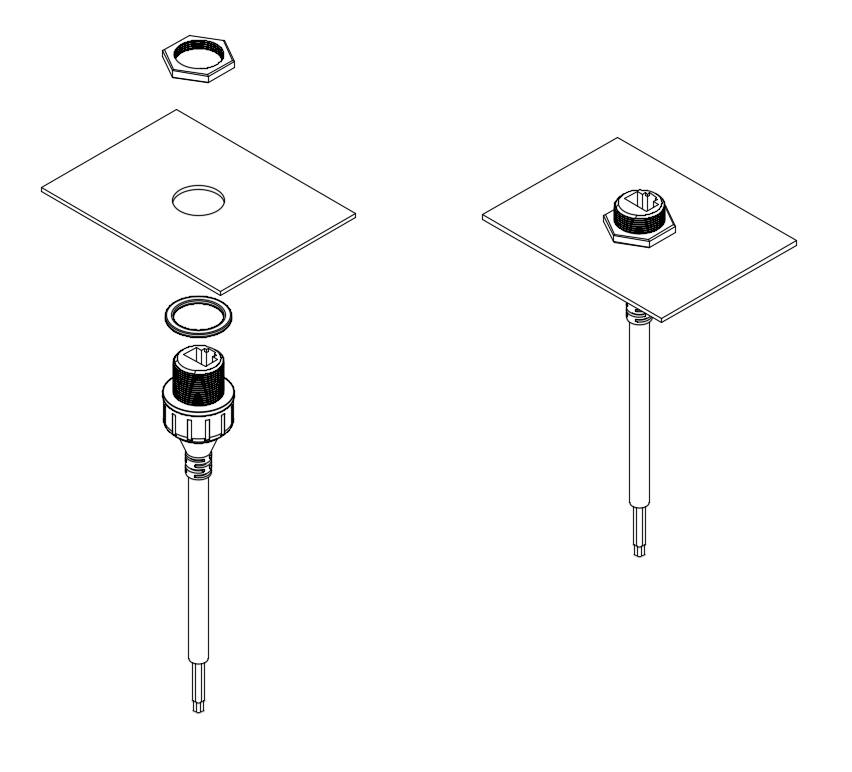
- Select a flat surface on the lighting fixture or panel where the XPD-T2P will be mounted. The fixture must include a 20.7 mm (0.81 in) diameter hole for proper mounting of the device.
- Insert the device through the opening from the interior side of the fixture or panel.
- Place the provided gasket between the device flange and the panel surface to ensure a tight, sealed fit.
-
Thread the retaining nut onto the front of the device and tighten by hand until snug. Do not overtighten.
FIG. 1: Attaching to a lighting fixture
Note
Ensure the gasket is properly seated to maintain enclosure integrity and prevent moisture ingress.
Waterproof Kit#
For installations in wet or outdoor environments, a waterproof kit must be used to maintain proper ingress protection.
Note
The waterproof kit (XPD-T2P-WPKIT) is sold separately and should be installed to achieve rated protection.
- Review all cautions and warnings to ensure safe installation practices are followed.
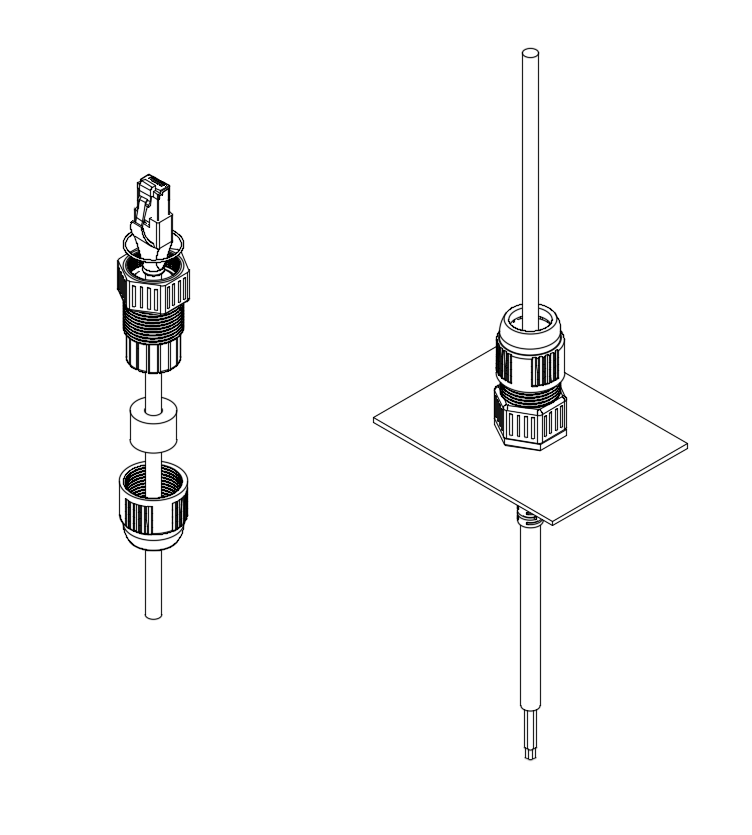
- Slide the compression nut over the RJ45 connector first.
- Wrap the sealing gland around the cable jacket just behind the connector.
- Insert the O-ring into the front of the waterproof kit body, then slide the body over the RJ45 connector and connect the RJ45 plug to the XPD-T2P port.
- Thread the body onto the XPD-T2P and hand-tighten until secure.
- Slide the sealing gland into the back of the waterproof kit body to ensure proper positioning and compression.
-
Finally, thread the compression nut onto the body and tighten to compress the sealing gland, ensuring a watertight seal.
FIG. 2: Attaching the waterproof kit
Output Wiring#
Perform the following steps to wire the output to a light fixture:
- Review all cautions and warnings to ensure safe wiring practices are followed.
- Connect the low-voltage lighting leads to the CH1 and CH2 wire leads extending from the XPD-T2P.
- Ensure correct polarity for each output connection (V+ to V+, V– to V–).
| Wire Leads | ||
|---|---|---|
| Channel 1 Output | Red (+) | White (-) |
| Channel 2 Output | Yellow (+) | Blue (-) |
Input Wiring#
Perform the following steps to wire the input to the XPD unit:
- Review all cautions and warnings to ensure safe wiring practices are followed.
- Connect an Ethernet cable from an X-PoE switch to the RJ45 input port on the unit.
- If the X-PoE port has not yet been configured, the device will power on at default output levels once connected.
Caution
When connecting to a live X-PoE switch, complete all output wiring before plugging in the input connection.
Initial Setup#
The XPD unit itself does not require configuration. Configure the associated X-PoE port using the Channel Configuration and Load Profiling guides.
Related Information#
Basic Troubleshooting#
Basic troubleshooting can be performed by observing the port status LEDs on the X-PoE switch. Refer to the Port Status LED Table in the X-PoE switch data sheet for detailed diagnostic information.
Technical Support#
If you experience any issues during installation or operation of this product, please contact our technical support team for assistance. Our technical support team is available via email at support@luum.io. Please provide a detailed description of the issue you are experiencing, including any error messages or other relevant information.
Warranty Information#
All Luum.io lighting products and controls come with a 5-year parts warranty. We warrant that our products will be free from defects in material and workmanship for a 5-year period from the date of purchase. Defective products under warranty will be replaced with an equal or higher quality product.
If you experience any issues with your product during the warranty period, we will repair or replace it at no charge to you. To initiate a warranty claim, please contact our customer service team at support@luum.io. For more information about our warranty policy, or for additional support options, please visit our website at www.luum.io.
Contacts#
Luum.io Headquarters
625 Kenmoor Ave STE 350
PMB 51933
Grand Rapids, MI. 49546
Phone: +1 (313) 314-3617
Document Feedback#
While we have taken great care to ensure the accuracy and completeness of this document, we welcome your feedback and suggestions to further improve it. If you notice any errors or omissions or feel that a topic could benefit from further explanation, please let us know by emailing your feedback to support@luum.io. Your input is valuable to us and will help us enhance the quality and usefulness of our documentation.
Revision History#
| HISTORY TABLE | ||
|---|---|---|
| 11/11/2025 | A | Initial XPD-T2P install guide release |
Disclaimer#
All rights, title, and interest in and to this manual, including without limitation all copyright, trademark, patent, trade secret, and other proprietary rights, belong solely and exclusively to Luum.io and/or its licensors. This manual is provided solely for the purpose of assisting in the installation and operation of the device, and no license or other rights are granted or implied hereby. No part of this manual may be reproduced, distributed, or transmitted in any form or by any means, including photocopying, recording, or other electronic or mechanical methods, without the prior written permission of Luum.io. The contents of this manual are subject to change without notice. The information contained herein is provided on an 'as is' basis and is for informational purposes only. Luum.io makes no warranty, express or implied, as to the accuracy, completeness, or usefulness of this information, nor does it assume any legal liability or responsibility for the consequences of any errors or omissions therein. The names of actual companies and products mentioned herein may be the trademarks of their respective owners.
Compliance Information#
This device is ETL Listed to UL 2108, confirming compliance with the applicable safety requirements for low-voltage lighting systems.